https://www.arduino.cc/en/Reference/WiFiConfig
// the IP address for the shield:
IPAddress ip(192, 168, 0, 177);
IPAddress dns(192, 168, 0, 177);
IPAddress gateway(192, 168, 0, 177);
WiFi.config(ip, dns, gateway);
WiFi.begin(ssid, pass);
Dit is de juiste volgorde. Ik heb er van de week mee lopen spelen omdat ik dacht dat er twee keer hetzelfde ip werd uitgedeeld. Bleek achteraf dat je niet twee keer dezelfde client name kan gebruiken op een MQTT server dus ik ben nu weer terug naar DHCP.
Ik heb zelf een temperatuur node gemaakt die via MQTT de data naar openhab stuurt. Alle sketches die ik tegenkwam waren te ingewikkeld of hadden niet direct support voor de DS18B20 ingebouwd.
Er zit zoveel mogelijk commentaar in de sketch waardoor ik hoop dat de meeste het zullen begrijpen zonder veel uitleg. Het is grotendeels een verbouwde sketch van de
pubsubclient library en ook word de
dallastemperature lib gebruikt.
code:
1
2
3
4
5
6
7
8
9
10
11
12
13
14
15
16
17
18
19
20
21
22
23
24
25
26
27
28
29
30
31
32
33
34
35
36
37
38
39
40
41
42
43
44
45
46
47
48
49
50
51
52
53
54
55
56
57
58
59
60
61
62
63
64
65
66
67
68
69
70
71
72
73
74
75
76
77
78
79
80
81
82
83
84
85
86
87
88
89
90
91
92
93
94
95
96
97
98
99
100
101
102
103
104
105
106
107
108
109
110
111
112
113
114
115
116
117
118
119
120
121
122
123
124
125
126
127
128
129
130
131
132
133
134
135
136
137
138
139
140
141
| #include <ESP8266WiFi.h>
#include <PubSubClient.h>
#include <OneWire.h>
#include <DallasTemperature.h>
WiFiClient espClient;
PubSubClient client(espClient);
// Update these with values suitable for your network.
const char* ssid = "domoticz"; // WIFI ssid
const char* password = "ikwilinternet"; // WIFI password
const char* mqtt_server = "192.168.11.100"; // MQTT server
unsigned int mqtt_server_port = 1883; // without the " " !!
const char* clientName = "projectx"; // Has to be unique on the network
const char* outTopic = "boven/projectx/temp"; // Topic for publishing messages
// Interval setup
long lastMsg = 0;
long interval = 60000;
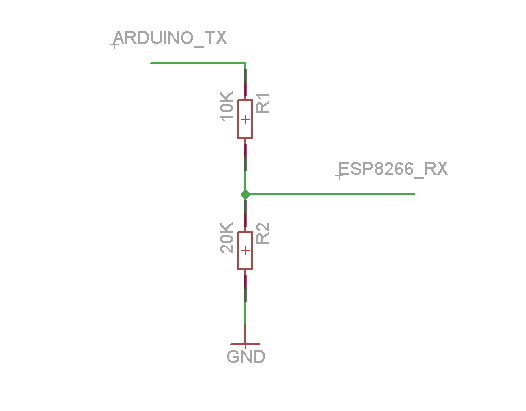
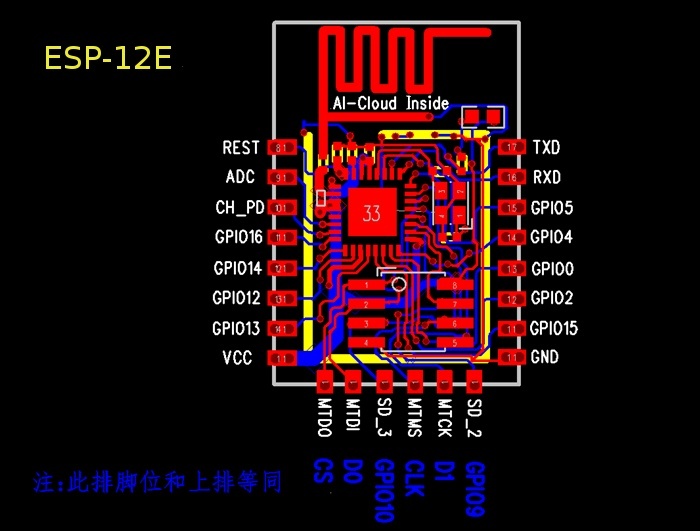
// DS18B20 is connected to gpio2
#define ONE_WIRE_BUS 2
// Set sensor resolution to 12 bit
#define TEMPERATURE_PRECISION 12
// Setup a oneWire instance
OneWire oneWire(ONE_WIRE_BUS);
// Pass oneWire reference to Dallas Temperature.
DallasTemperature sensors(&oneWire);
// Use this variable to store a found device address
DeviceAddress sensor0;
//DeviceAddress sensor1;
// Use this variable to store temperatures
float temp0;
static char temp0string[15];
//float temp1;
//static char temp1string[15];
void setup() {
Serial.begin(115200);
// Start up the DallasTemperature library
sensors.begin();
// Request device address
sensors.getAddress(sensor0, 0);
//sensors.getAddress(sensor1, 1);
// Set resolution to defined settings
sensors.setResolution(sensor0, TEMPERATURE_PRECISION);
//sensors.setResolution(sensor1, TEMPERATURE_PRECISION);
// Start by connecting to a WiFi network
delay(10);
Serial.println();
Serial.print("Connecting to ");
Serial.println(ssid);
WiFi.begin(ssid, password);
// Wait till wifi is connected
while (WiFi.status() != WL_CONNECTED) {
delay(500);
Serial.print(".");
}
// Print network information
Serial.println("");
Serial.println("WiFi connected");
Serial.println("IP address: ");
Serial.println(WiFi.localIP());
// Connect to MQTT server
client.setServer(mqtt_server, mqtt_server_port);
}
void loop() {
// Check if client is still connected, otherwise reconnect
if (!client.connected()) {
reconnect();
}
// Start loop
client.loop();
// Interval
long now = millis();
if (now - lastMsg > interval) {
lastMsg = now;
// Call sensors.requestTemperatures() to issue a global temperature request to all devices on the bus
sensors.requestTemperatures();
// Delay for DS18B20 to make it's measument
delay(750);
// Print temperature on serial for debugging
Serial.print("Temperature for the device 0 (index 0) is: ");
float temp0 = sensors.getTempC(sensor0);
Serial.println(temp0);
//Serial.print("Temperature for the device 1 (index 1) is: ");
//float temp1 = sensors.getTempC(sensor0);
//Serial.print(temp1);
// Convert temp0 float to string
dtostrf(temp0,4, 2, temp0string);
// Print topic and message for debugging
Serial.print("Publish to topic: ");
Serial.println(outTopic);
Serial.print("Publish message: ");
Serial.println(temp0string);
// Publish message to MQTT server
client.publish(outTopic, temp0string);
Serial.println("Message send!");
}
}
void reconnect() {
// Loop until we're reconnected
while (!client.connected()) {
Serial.print("Attempting MQTT connection...");
// Attempt to connect
if (client.connect(clientName)) { //client name has to be unique
Serial.println("connected");
// Once connected, publish an announcement to topic "debug"
client.publish("debug", "This is node:");
client.publish("debug", outTopic);
}
// Or fail to connect and try again
else {
Serial.print("failed, rc=");
Serial.print(client.state());
// Wait 5 seconds before retrying
Serial.println(" try again in 5 seconds");
delay(5000);
}
}
} |
Dit draait op het volgende
bordje, de source kan ik eventueel ook uploaden. Het is ontworpen in fritzing en bij DirtyPCB gefabbed. Stiekem toch wel een beetje trots omdat het mijn eerste bordje is. Zitten dan ook wel paar foutjes in die in een v2 moeten worden opgelost.
- GPIO-0 ook uitbreken voor een sensor, nu is dat alleen voor de reset knop. Heb er een draad opgesoldeerd om er toch gebruik van te kunnen maken.
- Andere voltage regulator gebruiken. Deze slikt maximaal 7 volt aan input dus heb voor de zekerheid een extra dc-dc stepdown ervoor gezet zodat vrijwel elke adapter tot 30 volt kan worden gebruikt.
- Een beter beschikbare USB plug gebruiken en meteen een usb-serial chip gebruiken (was er al voor gewaarschuwd door een tweaker

)
[
Voor 7% gewijzigd door
XyRuS op 26-09-2015 10:24
]
:strip_icc():strip_exif()/u/692240/crop56ddc7c9121dc_cropped.jpeg?f=community)
:strip_exif()/u/12601/cat_matrix2.gif?f=community)
:strip_icc():strip_exif()/u/10414/crop5817c0657774d_cropped.jpeg?f=community)
/u/212652/discopl0.png?f=community)
:strip_exif()/u/47368/icon3.gif?f=community)
/u/233904/Schermafbeelding%25202015-03-16%2520om%252001.02.27.png?f=community)

:strip_icc():strip_exif()/u/94045/crop66c1b4250e8a2_cropped.jpg?f=community)
:strip_exif()/u/10517/cup_anim.gif?f=community)
/u/524336/crop57ffe766deaff_cropped.png?f=community)


:strip_icc():strip_exif()/u/395395/crop55ad65379b519_cropped.jpeg?f=community)


/u/1544/download_small.png?f=community)


:strip_exif()/u/37438/crop589b7e01c006a_cropped.gif?f=community)
:strip_icc():strip_exif()/u/146731/crop562615a0aa64c.jpeg?f=community)
:strip_icc():strip_exif()/u/94119/358157.jpg?f=community)
:strip_icc():strip_exif()/u/407197/tweakers%2520forum.jpg?f=community)
